Showing posts with label organization. Show all posts

Wednesday, January 18, 2012

Marker Storage is Complete

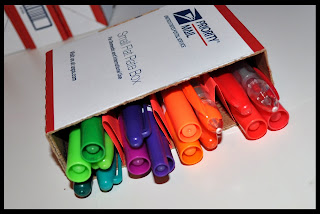
Well I finally came to a conclusion of how I wanted to stack my marker storage. I did notice that with my choice the markers would easily fall out so I folded some card stock and taped it to the bottom of each piece to give it a slight raise. I also decorated mine and as you will see I placed my markers with the cordinating colors.

I just used some scrapbook paper I had on hand and some mod podge and tada........


If yu decided to make one please link back and comment below. I would love to see your creations.


Through out the past couple of days I did notice some other items that may work for the storage as well...

Hamburger helper boxes
Hot cocoa boxes
(please share others you may have come across)

The above boxes you will need to tape the open flaps back closed

Saturday, January 14, 2012

Upcycled Marker/Pen Storage

If your holidays were anything like mine then you purchased a bunch of items. And since the holidays get really busy at my work I purchase a bunch of stuff online to save time. At the end of the holidays I always end up with a ton of empty boxes and envelopes. But instead of tossing them I prefer to recycle them.


-My small part in saving the planet-

And since this year I plan to get more organized I started thinking
Hmmmm….

I came up with an awesome idea that not only RECYCLES those old boxes but ORGANIZES my markers also. This project requires very minimum supplies and is quite easy.

So lets get started…..

Materials needed

Box
 (mine is a used small flat rate usps box)
Pencil
Ruler
Tape
(not pictured)
Box cutter
(or something sharp to cut with)


Step 1

  • Cut the box in half equally
  • Use the ruler to find the middle and place a mark at both ends of the box
  • Draw a line connecting the marks
  • Carefully cut all sides of the box


Mine was 4 1/4 inches


Step 2

  • Stack the boxes up the way you like.
Here are a couple of ideas…. Be creative


Step 3

  • Tape all the boxes together in the formation you prefer.
  • Make sure to tape along the cracks of where the boxes meet for a stronger hold
  • Follow my guide below

 (Follow the black lines with white dashes)


Step 4

Just for fun

(Picture coming soon)

Decorate your marker storage
Use scrapbook paper, left over wrapping paper, fabric, etc.

Now ORGANIZE!!!!!


 Allows for better visibility of color choices

Takes up the least amount of space

Versatile and no tape required


Alternative #1

If your short on boxes or don't have a lot of markers to store this is a great alternative.

Fold a piece of card stock to make dividers.
(You can make as many as you want, this setup makes 4 sections)
The flat pieces are measured at 1 inch.
The triangles are 2 1/2 inches then folded in half
The cardstock is the same width as the box 


Place the folded card stock in the box and place your markers inside


Alternative #2

 Use one to just make a pen holder


Have fun ORGANIZING!!


Wednesday, March 23, 2011

Organization

             So I decided to finally start my craft bog and failed
to do the most impartant thing....                   

FINISH my craft room!


 After a good day of work
I always have a little inspiration to
help get my home projects complete.
 May I introduce to you....
Coffee!!!


Before I can actually post any crafts I may be working on I have to have an area to work on them. Sometimes the living room just doesn't cut it. So today I will be trying my hardest to actually complete the major organization of my "Woman Room"


Everything from my ribbon to my rulers need to be put in a place, and I will find a place. No shelves will be hung today tho. :( I've misplaced my drywall anchors and haven't had the chance to pick up some more.

Well good luck to all thse fellow crafters out there on thier journey to an organized craft room


JWooten♥