Wednesday, January 18, 2012

Homemade Table Ruler

If your lucky enough to have an IKEA near you like I do then you've probably got a couple of their paper rulers laying around somewhere.


So why not put them to good use!!

I really want to but one of those self healing cutting mats but can't bring my self to spend $50 on the size I want. Its very annoying to always use my 12 inch ruler. 
Then I came up with this awesome idea......


Why not just tape that paper ruler to my table! And I did just that. I used packing tape so it was wider than the paper with the added benefit of being able to write on the tape with a dry erase marker. Now I have an easily accessible 39 inch ruler that can be written on over and over with no damage. YAY

Marker Storage is Complete

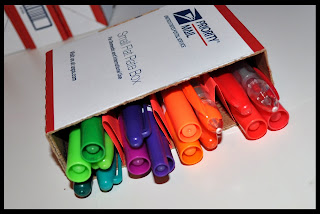
Well I finally came to a conclusion of how I wanted to stack my marker storage. I did notice that with my choice the markers would easily fall out so I folded some card stock and taped it to the bottom of each piece to give it a slight raise. I also decorated mine and as you will see I placed my markers with the cordinating colors.

I just used some scrapbook paper I had on hand and some mod podge and tada........


If yu decided to make one please link back and comment below. I would love to see your creations.


Through out the past couple of days I did notice some other items that may work for the storage as well...

Hamburger helper boxes
Hot cocoa boxes
(please share others you may have come across)

The above boxes you will need to tape the open flaps back closed

Saturday, January 14, 2012

Upcycled Marker/Pen Storage

If your holidays were anything like mine then you purchased a bunch of items. And since the holidays get really busy at my work I purchase a bunch of stuff online to save time. At the end of the holidays I always end up with a ton of empty boxes and envelopes. But instead of tossing them I prefer to recycle them.


-My small part in saving the planet-

And since this year I plan to get more organized I started thinking
Hmmmm….

I came up with an awesome idea that not only RECYCLES those old boxes but ORGANIZES my markers also. This project requires very minimum supplies and is quite easy.

So lets get started…..

Materials needed

Box
 (mine is a used small flat rate usps box)
Pencil
Ruler
Tape
(not pictured)
Box cutter
(or something sharp to cut with)


Step 1

  • Cut the box in half equally
  • Use the ruler to find the middle and place a mark at both ends of the box
  • Draw a line connecting the marks
  • Carefully cut all sides of the box


Mine was 4 1/4 inches


Step 2

  • Stack the boxes up the way you like.
Here are a couple of ideas…. Be creative


Step 3

  • Tape all the boxes together in the formation you prefer.
  • Make sure to tape along the cracks of where the boxes meet for a stronger hold
  • Follow my guide below

 (Follow the black lines with white dashes)


Step 4

Just for fun

(Picture coming soon)

Decorate your marker storage
Use scrapbook paper, left over wrapping paper, fabric, etc.

Now ORGANIZE!!!!!


 Allows for better visibility of color choices

Takes up the least amount of space

Versatile and no tape required


Alternative #1

If your short on boxes or don't have a lot of markers to store this is a great alternative.

Fold a piece of card stock to make dividers.
(You can make as many as you want, this setup makes 4 sections)
The flat pieces are measured at 1 inch.
The triangles are 2 1/2 inches then folded in half
The cardstock is the same width as the box 


Place the folded card stock in the box and place your markers inside


Alternative #2

 Use one to just make a pen holder


Have fun ORGANIZING!!


Friday, January 13, 2012

New Year...New Posts

I knwo I know!!! I'be been majorly slacking. No posts since July 2011. I thought my blog was gone forever. I'e had alot to juggle the past few months but I'm back. And with many fun things to do. One of my goals this year is to blog more. Well at least try to. Everytime I say that something happens, but I plan to KRAFT more. Until next time.....

Happy Krafting

Friday, July 29, 2011

On The Verge of a New Craft

NEW Project!!
 I have stumbled across a new creative adventure. Its still "hush hush" until I can get a couple decent ones made to share. It's still a work in progress but its so neat and simple.

Just an UPDATE:

Hung some shelves in my woman room - Finally got some screws/anchors.... they are screws with built in anchors. My hubby works at Lowe's so I get his special discount and the first dibs on mark downs. It was a pack of like 25 for $.92. You are correct I said 92 cents. He call all 5 packs for me. He's the best.

That means I get to hang all my shelves all around the house that have been waiting.

If you've came across any neat craft ideas please share...
                                                                I'm always up for new ideas.

Monday, July 4, 2011

It's been a while!!!

Wow

It's been a while since my last blog.
            Lots going on but not in the creative world :( Soon though. 


 I've made more shirts and have posted them over at my


I've had 8 sales so far. None recently though but I'm proud of my eight.

I love knowing that there are people out there that admire and appreciate the things I've made. It's a wonderful feeling to make that first SALE. I was dancing all around the house full of joy.

Dont forget to swing by my facebook page and like it

Friday, May 6, 2011

Etsy Treasury

I have been featured in my 3rd treasury over at etsy since I've posted my first item.

Check it out